Building Ridgeline: Engineering a Real-Time 3D Experience in Webflow Demo

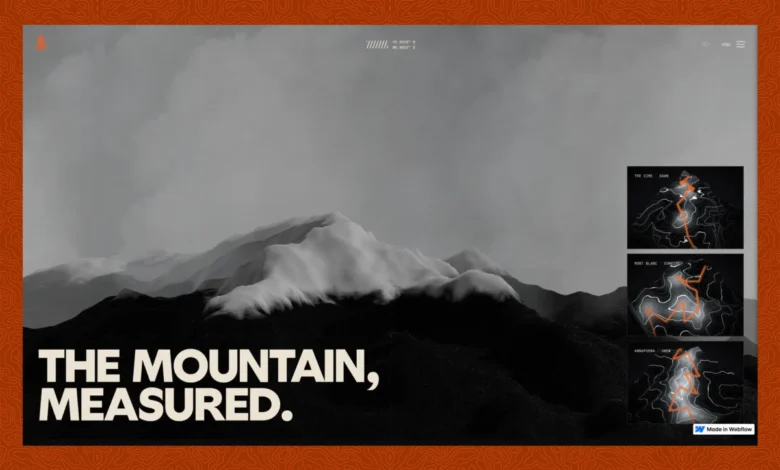
Ridgeline, a personal project by a developer, showcases the potential of integrating genuine, real-time 3D terrain rendering into Webflow, a popular no-code website building platform. This ambitious endeavor challenges the conventional limitations of web development by seamlessly merging complex 3D graphics, derived from actual elevation data, with the inherent editability of a no-code environment. The project, a cinematic exploration of three alpine treks, serves as a profound case study in overcoming technical hurdles to achieve a visually stunning and interactive user experience.
The core innovation lies in Ridgeline’s ability to present actual Digital Elevation Models (DEMs) as a meshed survey-contour representation, rendered live using Three.js. This is a significant departure from typical web design practices that often rely on pre-rendered video loops or sprite sheets for visual depth. The developer’s guiding principle was clear: "I don’t care if it’s a built-in component or external JS, I want to SEE it." This mantra dictated the project’s architecture, forcing a deep dive into two primary methods for incorporating real-time 3D into Webflow. The decision-making process, fraught with trade-offs, forms the crux of the project’s narrative.
The final website features three distinct "condition" scenes, each depicting a real trek rendered on its own terrain. These include "Dawn," a storm-laden experience above Tre Cime; "Sunrise," a journey through the blue-hour into pink hues at Mont Blanc; and "Snow," a depiction of Annapurna under a night sky with falling snow. These immersive experiences are further enhanced by scroll-driven photography, ambient soundscapes, and an atlas-style homepage that allows users to navigate through terrain previews of each scene. Notably, all the 3D geometry is built and maintained through code via the Webflow MCP (Model Context Protocol), while the project itself remains a standard, human-editable Webflow instance.
The "Dawn" trek is a personal rendition of the developer’s own hike above Cortina in the Tre Cime. The GPS track, exported from Strava and meticulously cleaned of anomalies, was then draped onto the actual SRTM slope data. To maintain a degree of privacy and focus on the terrain’s recognizability, only a normalized, coordinate-free version of the track is utilized. For the "Sunrise" and "Snow" scenes, synthesized routes were employed due to the absence of recorded GPS tracks for those specific locations.
A significant accelerator for this project was the use of AI coding assistants. The entire site was developed with Claude (Opus 4.8 and Fable 5), which powered the Webflow MCP, enabling rapid development and bringing the project to completion in approximately one week. A detailed build log, documenting every decision, success, and setback, was maintained from the outset, offering a transparent look into the development process.
The Stack: A Synergistic Approach
The technical foundation of Ridgeline is built upon a carefully selected stack designed to bridge the gap between advanced 3D rendering and the Webflow environment. This includes:
- Webflow MCP: For programmatic control over the Webflow project structure, content, and settings.
- Three.js: A powerful JavaScript library for creating and displaying animated 3D computer graphics in a web browser.
- Blender: A free and open-source 3D creation suite used for modeling and preparing the terrain data.
- glTF: A royalty-free specification for the transmission and loading of 3D scenes and models, optimized for web delivery.
- React: A JavaScript library for building user interfaces, used for managing dynamic elements and interactivity.
- GSAP (GreenSock Animation Platform): A high-performance JavaScript animation library for creating complex animations and transitions.
- Lenis: A library for smooth scrolling, integrated with GSAP for refined user interaction.
- Claude (AI Assistant): Utilized for code generation, debugging, and architectural guidance throughout the development process.
- R2 (Cloudflare Workers KV): Employed for hosting static assets like GLB files and other necessary resources.
Integrating Real-Time 3D: The Embed vs. Code Component Dilemma
Webflow offers a native pathway for integrating custom code through Code Components, which can be deployed via DevLink or shared libraries, appearing as first-class elements within the Designer. This approach is typically well-suited for UI-centric components. However, Ridgeline’s requirements—a substantial WebGL bundle, Three.js integration, a Blender-based asset pipeline, and R2-hosted GLBs—presented a different kind of challenge. The sheer complexity of this machinery made routing it through a standard component system less practical.
The developer evaluated this against a self-hosted JavaScript embed. Ultimately, the embed proved to be the more suitable choice for this project, despite the trade-off of not having a drag-and-drop Designer element. The embed’s flexibility allowed for the integration of a heavy, single-bundle WebGL application without the constraints of a component framework.
To bridge the gap between the visual design in Webflow and the programmatic rendering of the 3D scenes, an attribute-driven mounting system was implemented. The JavaScript embed actively searches for host elements designated by specific attributes within the Webflow Designer. For instance, elements marked with [data-terrain-scene] or [data-terrain-card] act as containers where the 3D scenes are mounted. This allows the Webflow designer to retain full control over layout and placement, while the code dynamically populates these designated areas with the relevant 3D content.
An example of this attribute-driven mounting is demonstrated by the following JavaScript snippet:
// The embed hunts for designer-placed hosts and mounts into them, so the
// Webflow user keeps arranging layout and the 3D fills the slots they define.

document.querySelectorAll("[data-terrain-card]").forEach((host) =>  "sunrise" );
This approach ensures that the visual structure defined in Webflow remains editable and intuitive for designers, while the intricate 3D rendering is managed seamlessly by the embedded JavaScript.
Key Takeaways from this integration strategy:

- Flexibility for complex assets: JavaScript embeds offer greater freedom for integrating large, complex libraries and build pipelines like WebGL applications.
- Designer control over layout: Attribute-driven mounting preserves the visual designer’s ability to control element placement and responsiveness within the Webflow interface.
- Code-driven content: The actual 3D content and its behavior are managed entirely by code, offering precise control over rendering and interactivity.
Building the Entire Site Programmatically: The Webflow MCP Workflow
One of the most surprising revelations from the Ridgeline project is the capability of the Webflow MCP (Model Context Protocol) to manage the entire website programmatically. This protocol allows for the automated creation, modification, and publishing of Webflow projects through an agent. In this case, Claude served as the agent, orchestrating the entire build process, from page structure and components to CSS classes, variables, custom code, SEO settings, and even publishing. The remarkable outcome is a fully functional Webflow project that remains accessible and editable by human users.
The governing rule established for this programmatic approach was: "Markup and CSS live in the Webflow Designer as named components and classes. Behavior, 3D, and animation live in versioned JS on R2. The Designer holds structure; the CDN holds behavior." This separation of concerns ensures that the visual design elements are managed within Webflow’s familiar interface, while the dynamic and interactive aspects are handled by code hosted on a Content Delivery Network.
Webflow provides two distinct avenues for custom code integration: registered scripts (via the Scripts API) for injected JavaScript, and head/footer custom code for raw HTML and CSS. Elements requiring immediate execution upon page load, such as the initial styling to prevent a flash of unstyled content, must be placed within the latter. This distinction is crucial for controlling the initial rendering behavior of the website.
Key Takeaways from the Webflow MCP workflow:
- Full programmatic control: The Webflow MCP enables comprehensive automation of website development and management, extending beyond simple code injection.
- Hybrid development: It facilitates a hybrid approach where visual design elements are managed in Webflow, while complex functionalities are coded and deployed separately.
- Human-editable output: Despite being built programmatically, the resulting Webflow project remains accessible and editable by human designers and developers, ensuring flexibility and collaboration.
Crafting Realistic 3D Environments: Blender to glTF to Three.js
The non-negotiable aspect of Ridgeline was the authenticity of its 3D geometry. The terrains are not mere graphical illusions but are derived from real DEM data of actual mountain massifs. This data is then meticulously modeled in Blender, exported to the glTF format, and subsequently loaded into Three.js for real-time rendering. This pipeline ensures that the visual representation is grounded in physical reality, starting with the raw topographical information.
The process unfolds as follows:
- DEM to Mesh: Raw Digital Elevation Model data is processed and converted into a 3D mesh.
- Blender Modeling: The mesh is imported into Blender, where it undergoes further refinement, including applying modifiers and potentially sculpting for artistic enhancement. Custom properties are added to objects, which are then exported as glTF extras.
- glTF Export with Draco Compression: The Blender scene is exported as a glTF file. Crucially, Draco compression is applied, significantly reducing file sizes (often by 5-13x) without compromising visual quality. This is essential for efficient web delivery. The export parameters are meticulously set:
bpy.ops.export_scene.gltf( export_yup=True, // Blender Z-up to three.js Y-up export_apply=True, // bake modifiers export_extras=True, // object custom props to glTF extras to three.js userData // ALWAYS Draco-compress. Static meshes shrink 5-13x (11 MB to ~1 MB) export_draco_mesh_compression_enable=True, export_draco_mesh_compression_level=6, export_draco_position_quantization=14, ) - Three.js Loading: The compressed glTF models are then loaded and rendered within the Three.js environment in the web browser.
The resulting terrain GLB files, after Draco compression, are remarkably small, typically ranging from 540-580 KB each. This size is small enough that download times do not become a bottleneck. The performance challenges encountered were primarily related to GPU and main thread processing, rather than asset loading.
The Survey-Map Aesthetic: Shader-Driven Visuals
The distinctive survey-map aesthetic of the terrain is not achieved through textures but through a sophisticated fragment shader. This shader dynamically reads the mesh’s world-space height to create contour lines. A key technique employed to maintain crisp lines at any camera distance is the use of fwidth(). This function calculates the screen-space width of anti-aliasing based on the rate of change of the band index, ensuring that contour lines appear consistently one pixel wide, regardless of zoom level.
The fragment shader code illustrates this process:
// Survey-contour terrain (fragment): banding by elevation, hillshade, snow line.
float scaled = vWorldPos.y * uContourFreq;            // height to band index
float dMinor = abs(fract(scaled) - 0.5) * 2.0;
float aa     = fwidth(scaled) * 2.0;                  // screen-space AA width, crisp at any zoom
float minor  = 1.0 - smoothstep(uContourWidth - aa, uContourWidth + aa, dMinor);

// every Nth line is a bolder "index" contour, the classic survey-map read
float dMajor = abs(fract(scaled / uMajorEvery) - 0.5) * 2.0;
float major  = 1.0 - smoothstep(uContourWidth * uMajorBoost - aa, uContourWidth * uMajorBoost + aa, dMajor);
float line   = max(minor * uMinorDim, major);

// hillshade from the surface normal, elevation tint, snow above the line
float shade  = clamp(dot(normalize(vWorldNormal), normalize(uLightDir)), 0.0, 1.0);
float elev   = clamp((vWorldPos.y - uElevLo) / (uElevHi - uElevLo), 0.0, 1.0);
vec3  ground = mix(uGround, uGroundHi, elev);
ground = mix(ground, mix(uGround * 0.5, ground * 0.92, shade), uHillshade);
ground = mix(ground, uSnowColor, smoothstep(uSnowLineY, uSnowLineY + uSnowSoftness, vWorldPos.y) * uSnowStrength);

vec3 contourCol = mix(uContourLo, uContourHi, elev);
gl_FragColor = vec4(mix(ground, contourCol, line), 1.0);
Each scene employs the same shader but with customized uniform values for colors, snow strength, and light direction, creating distinct visual identities for Dawn, Sunrise, and Snow while sharing a common rendering program. A subtle yet effective touch is the use of per-pixel dithering to eliminate visible banding in gradients, particularly noticeable in the near-black dawn scenes. This technique helps to smooth out the visual transitions and enhance the overall fidelity of the rendering.
Key Takeaways from 3D Environment Creation:
- Real-world data integration: Utilizing actual DEM data provides an unparalleled level of authenticity to the terrain representation.
- Efficient asset delivery: Draco compression for glTF models significantly reduces file sizes, optimizing web performance.
- Shader-driven aesthetics: Employing shaders for visual effects like contour lines and hillshading offers flexibility and avoids the need for high-resolution textures.
- Shader reusability: A single shader program with configurable uniforms allows for distinct visual styles across different scenes, promoting efficiency.
Seamless Animation: Scroll-Driven Interactivity Without React Re-renders
All animations within Ridgeline are driven by user scroll events. A crucial design principle is to avoid re-rendering React components on every scroll update. Instead, scroll progress is captured in a ref and read within the render loop, ensuring performance efficiency.

The animation architecture leverages Lenis for smooth scrolling, integrated with GSAP for sophisticated animation control. This integration ensures that scroll events are processed efficiently and translated into fluid visual movements.
// Lenis + GSAP, wired once. Lenis drives the ticker; ScrollTrigger reads it.

lenis.on("scroll", ScrollTrigger.update);
gsap.ticker.add((t) => lenis.raf(t * 1000));
gsap.ticker.lagSmoothing(0);
Two particular animation patterns proved instrumental in achieving the desired visual effects and performance:
-
Frame-Collapse Section: This technique involves animating a full-screen image to collapse into a smaller, fixed-aspect ratio plate while surrounding images stream in. The challenge here was to avoid visual glitches caused by aspect ratio changes during animation. The solution was to use a fixed 4:5 box, initially sized to cover the viewport, and animate its scale using
transform: scale. This maintains a constant aspect ratio, preventing the browser from re-cropping the image on each frame and thus avoiding layout thrash.// Uniform scale only. No width/height tween, so no re-crop, no layout thrash. const coverW = Math.max(W, H * 0.8); const scale = ip(ip(1.14, 1, parallax), plateW / coverW, collapse); gsap.set(hero, xPercent: -50, yPercent: -50, scale ); -
CSS Drift Animation Synchronization: A more complex challenge arose with CSS drift animations that started from an offset state (e.g.,
scale(1.04) translate(...)). When these animations engaged mid-scroll, the element would visibly snap to its initial offset position. This "jump" persisted despite various fixes to the collapse math, as it was not directly related to the collapsing element. The critical lesson learned was that any animation toggled mid-scroll must originate from the element’s resting state (identity transform) to avoid abrupt visual shifts.
Key Takeaways from Animation Implementation:
- Scroll-driven efficiency: Capturing scroll progress in refs and reading it in the render loop avoids unnecessary React re-renders, optimizing performance.
transform: scalefor aspect ratio consistency: Animating scale rather than width/height prevents re-cropping issues and maintains smooth visual transitions.- Animation start state: Ensuring animations begin from the element’s identity transform state prevents jarring visual snaps when toggled mid-scroll.
Managing Seams: Preloader, First-Paint Flash, and Audio Gate
The most time-consuming aspects of the Ridgeline project were not the 3D rendering itself but the management of transitions and the "seams" between different states and loading processes. These often subtle moments required meticulous attention to detail to ensure a seamless user experience.
First-Paint Flash Prevention: A common issue in web development is the brief display of raw HTML before JavaScript executes, leading to a "flash of unstyled content." In Ridgeline, this was addressed by embedding minimal CSS directly into the <head> custom code section of Webflow. This CSS immediately sets a dark background and hides all page content (body > * visibility: hidden !important; ) until the main JavaScript loader takes over. A failsafe setTimeout is also included to remove the guard and reveal content if the JavaScript fails to load, preventing a permanently blank page.
<!-- In Webflow head custom code. Runs at first paint, before the JS loads. -->
<style>html,bodybackground:#0a0a09</style>
<style id="topo-fp-guard">
  html,bodybackground:#0a0a09!important
  body>*visibility:hidden!important   /* hide everything until the JS takes over */
</style>
<!-- Failsafe: if the JS never loads, don't leave the page blank forever. -->
<script>setTimeout(function()var g=document.getElementById("topo-fp-guard");if(g)g.remove();,8000);</script>
The main JavaScript then removes the #topo-fp-guard element and initiates the actual preloader. This synchronized approach ensures a smooth transition from the initial paint to the loading state.
Audio Gate: To comply with browser autoplay policies, which restrict audio playback without user interaction, the preloader concludes with an explicit "Enter" or "Enter-muted" option. This user gesture serves as the necessary trigger to unlock the ambient audio bus, preventing console errors related to uninitiated autoplay.
Ambient Sound Design: Once the audio gate is passed, each scene features subtle, ambient soundscapes designed to enhance the atmosphere rather than impose a soundtrack. The guiding principle for sound design was that "sound should be the thing you’d miss if it were gone, not the thing you notice when it’s there." This approach ensures that the audio complements the visual experience without becoming intrusive.
Key Takeaways from Seam Management:
- Proactive flash prevention: Embedding critical styles in the
<head>custom code is essential for controlling initial rendering and avoiding unstyled content. - User-initiated audio: Implementing an explicit user gesture for audio activation is necessary to comply with browser autoplay restrictions.
- Atmospheric sound design: Subtle ambient audio enhances immersion without distracting from the primary visual experience.
Page Transitions Without Frame Drops
Transitions between different scenes in Ridgeline are managed through a PJAX (PushState + AJAX) swap, augmented by a WebGL "flood" cover. This cover provides a visual transition effect—a topographic contour reveal that sweeps in, holds, and then drains—before the new scene is fully loaded and rendered.

A critical architectural decision was to maintain a single, persistent WebGL context throughout the navigation process. Instead of tearing down and recreating the canvas for each new scene, navigation simply calls a setScene function to swap the scene data. This approach avoids the performance issues associated with re-initializing graphics contexts, such as evicted contexts and jarring black flashes.
However, a subtler problem emerged: the flood cover would drain before the material shaders for the new scene had fully compiled. This resulted in the main thread stalling during the visible reveal as shader compilation occurred. The solution was to implement compileAsync, which leverages the parallel-shader-compile extension. This allows the heavy shader compilation and GLB upload to occur off the main thread. The "scene-ready" event, which triggers the draining of the flood cover, is only fired once the GPU is actually ready, ensuring a smooth and uninterrupted transition.
// Compile the swapped-in scene's shader + upload its GLB OFF the main thread,
// and only fire scene-ready (which drains the flood) once it's actually GPU-ready.

if (gl.compileAsync)
  const done = () => onMesh(mesh, bbox);          // dispatches "topo:scene-ready"
  const fallback = setTimeout(done, 1200);        // never hang the transition
  gl.compileAsync(root, camera).then(() =>  clearTimeout(fallback); done(); );
This same technique is used to pre-warm the summit-cairn scene before it scrolls into view, eliminating a noticeable freeze that previously occurred on the first reveal. While a small amount of synchronous work (approximately 110ms for the HTML swap and JavaScript re-wiring) remains during the opaque flood transition, it is performed invisibly, reflecting a pragmatic approach to optimization where perceived performance is prioritized.
Key Takeaways from Page Transitions:
- Persistent WebGL context: Reusing a single WebGL context for scene swaps significantly improves transition performance and stability.
- Asynchronous shader compilation: Using
compileAsyncoffloads GPU-intensive tasks from the main thread, preventing stalls during transitions. - Pre-warming scenes: Pre-compiling shaders and uploading assets in advance minimizes delays when scenes become visible.
- Pragmatic optimization: Focusing on invisible optimizations during opaque transitions allows for efficiency without compromising the user experience.
Performance Optimization: The Art of Doing Less
Achieving a consistent 60fps frame rate was a primary objective, driven by a philosophy of "stop doing work that doesn’t change a pixel." To this end, a custom in-page FPS profiler was developed. This tool allows for real-time frame rate monitoring, bucketing performance by scroll depth and labeling specific sections of the site. This data-driven approach enabled targeted optimizations, addressing specific bottlenecks.
The impact of these optimizations is evident in the performance improvements:
| Area | Before | After |
|---|---|---|
| Homepage intro (canvases) | 46fps, min 33 | 60fps, min 56 |
| Snow scene (falling snow) | 37fps | 60fps |
| Summit reveal (first scroll) | ~1000ms freeze | Gone |
| Footer entrance | min 7fps | min 57fps |
The most impactful wins, achieved without any visual degradation, include:
-
GPU-driven snowfall: The falling snow effect is handled entirely by the GPU shader. Particle positions are uploaded once, and the shader manages their movement and wrapping, eliminating CPU-intensive particle simulations.
// GPU snowfall. Positions upload once; the shader does the falling and wrapping. transformed.y = mod((position.y + 1.2) - aSpeed * uTime, uRange) - 1.2; transformed.x = position.x + sin(uTime * 0.6 + aSway) * 0.1; -
Static meshes for terrain: The core terrain geometry, once loaded, remains static. All dynamic visual elements, such as camera movement and lighting changes, are applied through transformations and shader uniforms, avoiding mesh manipulation.
-
Canvas pooling for the homepage: Instead of creating and destroying canvas elements for the initial terrain previews on the homepage, a pool of canvases is maintained. These canvases are reused, significantly reducing the overhead associated with DOM manipulation and WebGL context creation.
-
Optimized particle simulation for snow: As mentioned, the snow simulation is entirely GPU-based, leveraging the shader’s ability to perform parallel computations on vast numbers of particles.
-
Scroll-triggered rendering updates: Rendering updates for complex scenes are carefully synchronized with scroll events, ensuring that rendering work is only performed when necessary and visible to the user.

The overarching principle guiding these performance improvements is that "the fastest frame is the one that doesn’t do work." The majority of gains were realized through removal of unnecessary operations rather than through complex algorithmic optimizations.
Key Takeaways from Performance Optimization:
- Data-driven profiling: A custom FPS profiler is invaluable for identifying specific performance bottlenecks.
- GPU offloading: Moving computationally intensive tasks like particle simulations to the GPU is crucial for high frame rates.
- Resource pooling: Reusing elements like canvas elements minimizes DOM and WebGL context overhead.
- Elimination of unnecessary work: The most effective performance gains often come from identifying and removing redundant or non-essential operations.
Content Management: Editable and Discoverable
While the scene pages are static, Ridgeline incorporates a CMS Collection for editable content, specifically the gallery. This ensures that editorial content remains manageable within Webflow’s user interface, rather than being hardcoded. The pattern for seamless integration between the CMS and code embeds involves:
- Data Fetching: JavaScript fetches CMS data through the Webflow API.
- Template Rendering: This data is then used to dynamically render templates, populating the embedd elements with up-to-date content.
- Attribute-Driven Binding: Similar to the 3D scene mounting, attributes are used to bind CMS data to specific elements within the embed, ensuring correct mapping.
Maintaining real and editable content, coupled with a fast loading experience (achieved through the performance optimizations), significantly enhances discoverability. Clean semantic markup, per-page titles and meta descriptions, and strong Core Web Vitals scores are precisely what search engine crawlers and AI answer engines prioritize. This approach ensures that the website is not only engaging for users but also well-indexed and accessible to machines.
Key Takeaways for Content Management:
- Hybrid content approach: Using CMS collections for editorial content alongside code embeds provides flexibility and maintainability.
- API integration for dynamic content: Leveraging the Webflow API allows for real-time content updates within code-driven sections.
- SEO benefits of speed and semantics: Optimized performance and clean markup contribute directly to better search engine rankings and AI discoverability.
Reflections and Future Considerations
If embarking on a similar project again, several lessons stand out:
- Prioritize the user experience: The most critical aspect is observing the actual rendered page. Jumps, flashes, and frame drops, though invisible in code, are glaringly apparent to the end-user.
- Embrace AI coding partners: Tools like Claude can dramatically accelerate development, offering assistance in complex coding tasks and architectural decisions.
- Master the Webflow MCP: For projects requiring deep programmatic control, understanding and utilizing the Webflow MCP is essential.
- Optimize for the "seams": The moments between states—loading, transitions, and initial paints—require meticulous attention and often represent the most challenging aspects of development.
The recurring lesson is that "it compiles" is not synonymous with "it’s done." The true measure of completion lies in the seamless and performant execution of the application in a real-world user environment.
My Stack for Ridgeline
The technical backbone of Ridgeline is a testament to modern web development practices:
- Frameworks: React for UI, GSAP for animation, Lenis for smooth scrolling.
- Rendering: Three.js for real-time 3D graphics.
- 3D Asset Pipeline: Blender for modeling, glTF with Draco compression for efficient delivery.
- Deployment & Hosting: Webflow for CMS and structure, R2 (Cloudflare Workers KV) for static assets.
- Development Tools: Claude (AI Assistant) for code generation and assistance.
- Version Control: Implicitly managed through the development process, with a focus on maintainable code.
Ridgeline stands as a compelling demonstration of how cutting-edge 3D technologies can be integrated into widely accessible web development platforms, pushing the boundaries of what is possible for interactive and visually rich online experiences.