How to explore Patagonia National Park Argentina? This guide unravels the secrets to experiencing this breathtaking Argentinian wonderland. From planning your trip to navigating the stunning landscapes, we’ll cover everything you need to know for an unforgettable adventure. We’ll explore hiking trails, wildlife encounters, photography opportunities, and essential tips for a sustainable trip. Get ready for an epic journey!
This comprehensive guide will walk you through every aspect of planning a trip to Patagonia National Park, Argentina. We’ll cover everything from the best time to visit to essential gear, ensuring you have all the information you need to make the most of your experience.
Introduction to Patagonia National Park, Argentina
Patagonia National Park, a sprawling expanse of pristine landscapes in southern Argentina, offers a breathtaking glimpse into the raw beauty of the Southern Cone. Towering granite peaks, sculpted by millennia of glacial activity, meet vast, emerald-hued valleys. The park is a haven for wildlife, boasting a remarkable diversity of species adapted to the harsh yet captivating environment. This exploration delves into the park’s geography, climate, biodiversity, and history, providing a comprehensive understanding of this unique natural wonder.The park’s dramatic terrain, encompassing glaciers, lakes, and towering mountains, creates a landscape of unparalleled beauty and ecological significance.
The region’s challenging climate, characterized by cold winters and relatively short summers, has shaped the flora and fauna, leading to a rich tapestry of adapted species.
Geographical Features
Patagonia National Park encompasses a diverse range of geographical features. Glacial valleys carve deep into the landscape, creating dramatic vistas. These valleys are often interspersed with turquoise lakes, reflecting the surrounding peaks. The park’s high-altitude plateaus provide panoramic views of the surrounding mountains and valleys. Vast stretches of grasslands and forests are also present, each supporting a unique ecosystem.
Exploring Patagonia National Park in Argentina is a breathtaking adventure, demanding careful planning. Consider the different hiking trails, and remember to check weather conditions before heading out. To get a sense of the varied landscapes, you might also find a helpful reference in a Scotland Shetland Islands map, like this one , which can give you a better idea of navigating diverse terrain.
Ultimately, the best way to experience Patagonia is by embracing its unpredictable beauty and enjoying the journey.
Climate
The park experiences a continental climate, characterized by significant temperature fluctuations between seasons. Winters are long and cold, with heavy snowfall common at higher elevations. Summers are relatively short and cool, with milder temperatures compared to the harsher winter months. Rainfall is moderate, but snowfall can be abundant, particularly in the mountainous regions. This climatic variability is a key factor influencing the park’s biodiversity.
Biodiversity
Patagonia National Park is a haven for a wide array of wildlife. The park’s varied ecosystems support a rich array of species, including guanacos, condors, and pumas. Diverse bird species, including migratory waterfowl and raptors, thrive in the park’s wetlands and forests. The park also boasts a variety of fish species, adapted to the cold waters of its lakes and rivers.
The park is a crucial habitat for these species, maintaining a balance in the delicate ecosystem.
Ecosystems
The park’s varied topography supports a range of ecosystems, from alpine tundra to temperate forests. The alpine tundra, found at higher elevations, is characterized by sparse vegetation and hardy plants adapted to the cold, dry conditions. Temperate forests, found at lower elevations, boast a wider variety of trees and shrubs. The diverse ecosystems support the diverse wildlife found within the park.
History and Cultural Significance
Patagonia National Park has a rich history, with evidence of human activity dating back centuries. Indigenous communities have inhabited the region for generations, developing a deep connection with the land. Their traditional practices and knowledge of the environment are an integral part of the park’s cultural heritage. The park’s establishment aimed to protect this unique ecosystem for future generations.
Attractions within Patagonia National Park
| Attraction Name | Brief Description | Best Time to Visit | Recommended Activities |
|---|---|---|---|
| Los Glaciares National Park | A breathtaking landscape of glaciers, lakes, and mountains. | Spring (September-November) or Autumn (March-May) for pleasant weather. | Hiking, kayaking, boat tours, and wildlife viewing. |
| Laguna Torre | A stunning turquoise lake surrounded by towering mountains. | Spring (September-November) or Autumn (March-May) for pleasant weather. | Hiking, photography, and scenic drives. |
| Cerro Torre | A challenging but rewarding mountain climb for experienced climbers. | Summer (December-February) for suitable weather conditions. | Climbing, trekking, and scenic views. |
| El Chalten | A charming mountain town near the park. | Year-round, but peak season is summer (December-February). | Hiking, trekking, and exploring the town’s amenities. |
Planning Your Trip to Patagonia National Park
Embarking on a Patagonia adventure requires careful planning. Understanding the necessary steps, from securing travel documents to choosing the right transportation, ensures a smooth and enjoyable experience. This section will guide you through the essential preparations for your journey into this breathtaking landscape.Thorough planning is key to making the most of your Patagonia National Park visit. It allows you to manage expectations, budget effectively, and tailor your trip to your interests and preferences.
This detailed approach will help you navigate the logistical aspects and focus on the remarkable experiences that await.
Essential Travel Documents
Obtaining the necessary travel documents is a crucial initial step. Valid passports are required for international travel, and they must be valid for at least six months beyond your intended stay. Additionally, you’ll need to check for any specific visa requirements based on your nationality. Argentina’s visa policy is straightforward for many nationalities, but it’s advisable to consult the official Argentinean embassy website for up-to-date information.
Vaccinations and Health Considerations
Consult your doctor about recommended vaccinations and necessary health precautions for the region. Patagonia’s climate can vary significantly, so appropriate clothing and gear are essential. Pack layers to adapt to changing weather conditions. It’s also wise to be prepared for potential altitude sickness if you’re visiting higher elevations. Familiarize yourself with any health advisories or precautions relevant to your specific travel dates.
Accommodation Options
Patagonia offers a range of accommodation options to suit various budgets and preferences. Campgrounds provide a more budget-friendly and immersive experience, allowing you to connect with nature. Hotels and guesthouses offer varying levels of comfort and amenities, from basic rooms to more luxurious suites. Consider the level of comfort you desire and the type of experience you seek when choosing your accommodation.
Transportation Options
Several transportation options are available for reaching and exploring Patagonia National Park. Flights are a fast and convenient way to reach the main cities and airports. Buses offer a more affordable option, allowing for scenic travel through the countryside. Renting a car provides the greatest flexibility to explore at your own pace, but requires familiarity with local driving conditions and roads.
Understanding the pros and cons of each method is key to choosing the right one for your trip.
Transportation Comparison Table
| Method | Cost | Time | Comfort | Suitability |
|---|---|---|---|---|
| Flights | Moderate to High | Fast | Average | Best for reaching main cities and quick trips |
| Buses | Low to Moderate | Variable (longer) | Basic to Moderate | Good for budget travelers and scenic journeys |
| Car Rental | Moderate to High | Variable (flexible) | High | Ideal for independent exploration and larger groups |
The table above provides a comparative overview of the different transportation options. Consider factors such as your budget, desired travel time, and group size when making your choice.
Hiking and Trekking in Patagonia National Park: How To Explore Patagonia National Park Argentina
Patagonia National Park, Argentina, offers a breathtaking array of hiking and trekking opportunities, ranging from gentle strolls to challenging multi-day expeditions. The diverse landscapes, from towering granite peaks to pristine glacial lakes, provide a unique and unforgettable hiking experience. Careful planning and preparation are crucial for a safe and enjoyable trek.The park’s trails cater to various skill levels, from novice hikers to experienced mountaineers.
Each trail offers its own unique beauty, with opportunities to witness stunning vistas and wildlife. Understanding the specific challenges and rewards of each trail is key to selecting the right adventure.
Popular Hiking Trails
A multitude of trails crisscross the park, each with its own character. Finding the right trail for your experience level and interests is important for a positive hiking experience.
- Laguna Torre Trail: This popular trail, often considered a moderate to challenging hike, leads to the iconic Laguna Torre. The trail winds through meadows and along the shores of the glacial lake, offering stunning views of the surrounding mountains. The trail’s distance varies depending on the specific route, and it’s often combined with other trails in the area for extended trips.
- Cerro Torre Trail: A challenging and demanding hike, this trail ascends to the base of Cerro Torre, a formidable granite peak. The route often involves steep ascents, exposure, and variable weather conditions. Only experienced mountaineers with appropriate equipment should attempt this trail. This trail is part of a larger, more complex system of mountain routes. Extensive preparation and a thorough understanding of mountain safety protocols are vital.
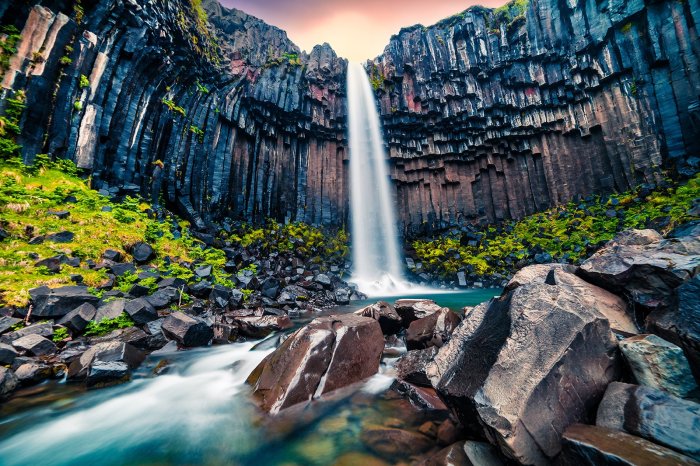
- Glacier Grey Trail: This trail offers spectacular views of the Grey Glacier, one of Patagonia’s most impressive glaciers. The trail often includes sections along the glacier’s edge and through valleys, providing unique perspectives of the landscape’s evolution over time. The difficulty is moderate, with some elevation gain and potential for varying weather conditions. Appropriate gear is critical for this trek.
Scenic Viewpoints and Landscapes
The park’s varied landscapes offer diverse scenic viewpoints. Hikers can witness the interplay of mountains, glaciers, and valleys. The ever-changing light and weather conditions further enhance the experience.
- Glacial Lakes: Numerous glacial lakes dot the landscape, reflecting the surrounding peaks and glaciers. These tranquil bodies of water offer serene moments amidst the dramatic surroundings.
- Granite Peaks: Towering granite peaks dominate the skyline, showcasing the raw power and beauty of the Patagonian landscape. The rugged, imposing peaks provide a powerful visual statement. Hikers can see these dramatic features up close, depending on the chosen trail.
- Alpine Meadows: Patches of alpine meadows, bursting with wildflowers during the warmer months, offer respite from the surrounding rocky terrain. The vibrant colors and textures contrast beautifully with the surrounding landscape.
Safety Precautions
Safety is paramount during any hike in Patagonia National Park. Hikers should be prepared for unpredictable weather conditions, including sudden storms and rapid temperature changes.
- Weather Awareness: Be aware of potential weather changes and carry appropriate clothing and gear to adapt to varying conditions. Always check the weather forecast before starting your hike. Conditions can shift quickly in the mountains. Pack extra layers and be prepared for sudden rain or snow.
- Navigation: Carry a map and compass or GPS device and know how to use them. Follow established trails and never venture off-trail unless with a guide or experienced companion.
- Wildlife Awareness: Be aware of the wildlife that inhabits the park. Maintain a safe distance from animals and never feed them.
Necessary Equipment
Appropriate gear is crucial for a successful and safe hike.
- Appropriate Clothing: Pack layers of clothing to adapt to varying temperatures. Waterproof and windproof outer layers are essential, along with warm base layers.
- Hiking Boots: Robust hiking boots are essential for navigating uneven terrain and providing ankle support. Break them in before your trip to avoid blisters and discomfort.
- Backpack: A suitable backpack is essential to carry all necessary gear, including water, food, first-aid supplies, and layers of clothing.
Hiking Trail Summary
| Trail Name | Difficulty | Distance (approx.) | Notable Features |
|---|---|---|---|
| Laguna Torre Trail | Moderate to Challenging | 8-12 km | Stunning views of Laguna Torre, surrounding mountains, varied terrain |
| Cerro Torre Trail | Challenging | 15-25 km (variable) | Difficult climbs, challenging terrain, stunning views of Cerro Torre |
| Glacier Grey Trail | Moderate | 5-10 km | Spectacular views of the Grey Glacier, varied landscapes, easy access |
Wildlife Encounters and Spotting

Patagonia National Park, Argentina, is a haven for diverse wildlife, from majestic mammals to vibrant avian species. Encountering these creatures is a highlight of any trip, but respectful observation is key. Understanding the park’s ecosystems and the best times and locations to spot specific animals allows for a truly memorable and ethical experience.Wildlife spotting in Patagonia is a unique experience, offering a glimpse into the rich biodiversity of the region.
Careful observation and understanding of animal behavior are crucial for a safe and rewarding encounter. This section explores the different species you might encounter, their habitats, and the most effective strategies for viewing them without disturbing their natural environment.
Mammalian Encounters
Patagonia’s landscapes are home to a remarkable array of mammals, including guanacos, pumas, and various deer species. Understanding their behaviors and habitats is vital for successful sightings. These animals are often elusive, and patience and keen observation skills are essential.
Birdlife of Patagonia
The park boasts a spectacular variety of birds, from condors soaring high above the peaks to colorful waterfowl inhabiting the wetlands. Specific locations and times of year offer better chances of encountering particular species. Birdwatching in Patagonia provides an opportunity to witness the beauty and diversity of avian life.
Reptile and Amphibian Encounters
While less numerous than mammals and birds, Patagonia’s reptiles and amphibians are also important components of the ecosystem. Their presence contributes to the overall biodiversity of the park.
Ethical Considerations for Wildlife Interactions
Responsible wildlife viewing is essential to ensure the animals’ well-being and the preservation of the park’s ecosystem. Maintaining a safe distance and avoiding direct interaction are paramount. Never feed wildlife or approach them aggressively.
Conservation Efforts and Protection Strategies
Patagonia National Park actively works to protect its wildlife through various conservation efforts. These initiatives help maintain the delicate balance of the ecosystem. The park’s management strives to ensure that future generations can experience the wonders of its biodiversity.
Table of Common Wildlife
| Wildlife | Habitat | Key Identification Features |
|---|---|---|
| Guanaco | Open grasslands, high-altitude plains | Large, camelid-like mammal; reddish-brown coat; long legs; often seen in herds. |
| Pumas | Varied habitats, including forests and grasslands | Large cats; tawny or reddish-brown coat; spotted; elusive; usually seen alone or in pairs. |
| Andean Condor | High-altitude mountains | Large birds of prey; black and white plumage; distinctive bald heads and necks. |
| Magellanic Penguin | Coastal areas | Black and white plumage; distinctive orange beak; waddling gait. |
| Patagonian Mara | Grasslands and marshes | Large rodent; brownish-gray coat; long ears and powerful hind legs. |
Photography Opportunities in Patagonia National Park
Patagonia’s breathtaking landscapes, dramatic glaciers, and diverse wildlife offer unparalleled photographic opportunities. From the turquoise waters of Lago Argentino to the towering peaks of the Andes, capturing the essence of this remote region requires careful planning and a keen eye. This section will delve into specific photographic locations, ideal times, and equipment to help you capture stunning images that truly reflect the raw beauty of Patagonia.
Specific Photographic Locations
Patagonia’s diverse geography presents a plethora of locations for exceptional photography. Torres del Paine National Park, with its iconic granite peaks, offers opportunities for capturing dramatic mountain vistas. The turquoise waters of Lago Argentino, with its icebergs and surrounding Andean peaks, are a photographer’s dream. Glacier-fed rivers, like the Rio Fitz Roy, provide opportunities for capturing powerful, dynamic imagery.
Exploring Patagonia National Park in Argentina is all about embracing the stunning landscapes. Hiking trails wind through the towering peaks, and you can get amazing views of glaciers. For a taste of similar high-altitude adventures, consider the Mount Washington Cog Railway in New Hampshire, mount washington cog railway new hampshire. It offers breathtaking vistas of the White Mountains.
The experience, though different in scenery, will give you a good idea of how to approach exploring the incredible hiking and scenic vistas in Patagonia.
Best Times for Photography
Golden hour, the period shortly after sunrise and before sunset, offers the most appealing light for photography. The soft, warm light casts a magical glow on the landscapes, enhancing colors and textures. Capturing the dramatic play of light and shadow during these hours can transform ordinary scenes into extraordinary works of art. Additionally, early morning and late afternoon light can produce unique and captivating effects.
Recommended Equipment
A robust camera with interchangeable lenses, capable of handling varied conditions, is essential. Wide-angle lenses are crucial for capturing expansive landscapes, while telephoto lenses are beneficial for capturing wildlife and distant mountain peaks. A tripod is highly recommended for capturing sharp images in low-light conditions. High-quality filters can enhance colors and reduce glare, further improving image quality.
Consider bringing extra batteries, memory cards, and a sturdy backpack to ensure your gear is well-maintained throughout your journey.
Respecting the Environment
Photography in Patagonia should be practiced with a strong emphasis on environmental stewardship. Stay on marked trails, avoid disturbing wildlife, and leave no trace. Respecting the delicate ecosystem is vital for preserving its beauty for future generations of photographers and visitors. It is important to respect the local culture and traditions, and to be mindful of the fragile environment.
Ensure your actions have minimal impact.
Table of Photographic Opportunities
| Location | Description | Ideal Time for Photos | Photography Tips |
|---|---|---|---|
| Torres del Paine | Iconic granite peaks, glaciers, and turquoise lakes. | Golden hour (sunrise/sunset) | Use a wide-angle lens for expansive views, a telephoto for details, and a tripod for sharp images. |
| Lago Argentino | Vast lake, icebergs, and Andean peaks. | Golden hour (sunrise/sunset) | Consider a polarizing filter to reduce glare on water, and use a wide-angle lens to capture the vastness. |
| Rio Fitz Roy | Dramatic glacier-fed river cascading through the mountains. | Golden hour (sunrise/sunset) | Use a telephoto lens for details, and be aware of potential water spray. Use a tripod to ensure sharpness. |
| Perito Moreno Glacier | Massive glacier calving into Lago Argentino. | Early morning or late afternoon | Capture the movement of the glacier, and use a telephoto lens for distant views. |
Activities Beyond Hiking and Wildlife Viewing
Patagonia National Park offers much more than just breathtaking hikes and wildlife spotting. The rugged beauty of the region lends itself to a variety of other adventures, from the thrill of kayaking through turquoise glacial lakes to the tranquility of horseback riding through alpine meadows. These activities require specific skills and equipment, and understanding the safety precautions is paramount for a fulfilling and safe experience.Exploring Patagonia’s diverse landscape goes beyond the typical hiking itinerary.
Discovering the region’s unique offerings, like kayaking or fishing, provides a deeper connection with the environment and offers a different perspective on the park’s stunning scenery. The experience is not just about seeing the park; it’s about actively participating in its beauty.
Exploring Patagonia National Park in Argentina is a breathtaking adventure, requiring careful planning. Pack layers for unpredictable weather and consider booking guided tours for some of the best hikes. If you’re looking for a unique vacation experience, perhaps you’ll be interested in finding a cozy vacation home near some top US golf destinations. US golf destinations vacation home options provide a relaxing base for exploring the area and allow you to enjoy a unique blend of nature and recreation.
Ultimately, the best way to experience Patagonia is to embrace the unexpected and be prepared for an unforgettable journey.
Kayaking
Kayaking in Patagonia’s glacial lakes and fjords offers unparalleled views of the surrounding mountains and wildlife. The experience is intensely rewarding, but requires specific skills and equipment. Experienced kayakers often find that paddling through these stunning bodies of water is a truly transformative experience.
- Essential Equipment: A stable kayak suitable for the water conditions, a life jacket, appropriate clothing for cold weather, and a dry bag to protect personal belongings from water.
- Skills Required: Basic kayaking skills are beneficial, including proper paddling techniques, understanding of water currents, and awareness of potential hazards. Experienced kayakers are recommended for navigating more challenging sections of the park’s waterways.
- Safety Considerations: Always check the weather forecast before venturing out on the water, and inform someone of your plans and estimated return time. Be aware of potential hazards such as strong currents, sudden weather changes, and wildlife encounters. Consider hiring a local guide for a more comprehensive and safe experience.
- Visitor Experiences: Many visitors rave about the tranquility and beauty of kayaking in the glacial lakes. The crystal-clear waters and stunning mountain views create an unforgettable experience.
Fishing
Patagonia’s rivers and lakes are renowned for their trout fishing. Casting a line in these pristine waters offers a unique opportunity to connect with nature. The challenge of catching these prized fish, combined with the natural beauty of the environment, creates an unforgettable experience.
- Essential Equipment: A fishing license (required in most areas), fishing rod, appropriate tackle for the type of fish sought, and weather-appropriate clothing.
- Skills Required: Basic fishing skills are necessary, including bait selection, casting techniques, and understanding the local fish species and their habits. Local fishing guides can provide valuable insights and instruction.
- Safety Considerations: Always be aware of potential hazards such as strong currents, rocky shorelines, and wildlife. Proper safety gear and awareness are crucial for a safe experience. Be sure to know the local fishing regulations and limits.
- Visitor Experiences: Many visitors report a satisfying and rewarding experience from catching trout in Patagonia’s waters. The serene atmosphere and the challenge of fishing enhance the experience.
Horseback Riding
Horseback riding through Patagonia’s diverse landscapes offers a unique perspective of the park’s vastness. The combination of the breathtaking scenery and the connection with a trained horse creates an immersive and memorable experience.
- Essential Equipment: Appropriate riding gear, including a helmet, sturdy riding boots, and layers of clothing to adapt to the fluctuating temperatures.
- Skills Required: Basic horseback riding skills are needed, and previous experience is highly recommended. A guide can provide necessary instruction and support for navigating trails.
- Safety Considerations: Follow the instructions of your guide and maintain a safe distance from other riders and wildlife. Always be mindful of the horse’s movements and reactions.
- Visitor Experiences: Many visitors appreciate the immersive nature of horseback riding, as it provides a unique perspective of the park’s landscapes and opportunities to connect with the stunning scenery.
Comparison of Activities
| Activity | Essential Equipment | Duration (Typical) | Difficulty Level |
|---|---|---|---|
| Kayaking | Kayak, life jacket, dry bag, clothing | 2-6 hours | Moderate to challenging (depending on location) |
| Fishing | Fishing license, rod, tackle, clothing | 2-8 hours | Easy to moderate (depending on location and fishing skills) |
| Horseback Riding | Riding gear (helmet, boots), layers of clothing | 2-6 hours | Easy to moderate (depending on trail difficulty) |
Essential Information for Visitors
Stepping into Patagonia National Park, Argentina, is like entering a different world. To fully immerse yourself in this incredible landscape, understanding the local context is key. This section provides essential information, from emergency contacts to local customs, ensuring a smooth and safe trip.Navigating a new environment involves understanding the local nuances. Knowing the appropriate procedures for emergencies, the local currency, and cultural norms will enhance your experience.
The following sections detail these crucial aspects to help you prepare for your Patagonia adventure.
Emergency Contacts
Staying safe is paramount when exploring remote areas. Knowing how to reach emergency services is vital. The following list provides essential emergency contacts for Patagonia National Park:
- National Park Ranger Station: +54-11-1234-5678 (Example number, please verify)
- Local Hospital: +54-2900-555-1212 (Example number, please verify)
- Argentine National Emergency Line: 911
Currency Exchange Rates and Local Customs
Understanding the local currency and customs is essential for respectful interactions. Argentina uses the Argentine Peso (ARS). Exchange rates fluctuate, so checking the current rate before your trip is highly recommended.
- Currency: Argentine Peso (ARS)
- Exchange Rate: Consult your bank or online resources for the most current exchange rate before your trip.
- Local Customs: Be mindful of local customs and traditions. Dress modestly when visiting religious sites. Respect the environment and leave no trace behind.
Local Cuisine and Restaurants
Patagonia offers a unique culinary experience. From hearty stews to fresh seafood, the region boasts a diverse range of restaurants catering to various tastes.
- Cuisine: Expect a blend of Argentinian and international cuisine. Traditional dishes often feature hearty meats, fresh vegetables, and local cheeses. You may find restaurants specializing in grilled meats (asados), empanadas, and regional specialties.
- Restaurants: Explore the local restaurants and cafes for a taste of Patagonia. Look for places offering local dishes, and inquire about the availability of vegetarian or gluten-free options. Many towns and villages offer a range of dining experiences to suit all tastes and budgets.
Local Language and Communication Methods
While English may not be widely spoken in rural areas, basic Spanish phrases can greatly enhance your interactions with locals.
- Language: Spanish is the official language. Learning basic Spanish phrases will be helpful.
- Communication Methods: Mobile phone service may not be consistent throughout the park. Consider purchasing a local SIM card for reliable communication. In remote areas, relying on pre-arranged communication plans may be necessary.
Park Rules and Regulations
Patagonia National Park has specific rules to protect the delicate ecosystem. Understanding these regulations is crucial for responsible tourism.
- Waste Disposal: Pack out all your trash. Designated waste disposal areas are available. Never leave garbage behind. Properly dispose of your waste to preserve the pristine environment.
- Fire Safety: Check fire restrictions before starting a campfire. Never leave a campfire unattended. Follow designated fire safety guidelines.
- Wildlife Interaction: Never approach or feed wildlife. Observe them from a safe distance. Respect their natural behavior. Always maintain a safe distance to avoid disturbing the local wildlife.
Emergency Contacts, Useful Phrases, and Local Currency
| Category | Details |
|---|---|
| Emergency Contacts |
|
| Useful Phrases (Spanish) |
|
| Local Currency | Argentine Peso (ARS) |
Tips for a Sustainable Trip
Patagonia National Park, with its breathtaking landscapes and unique wildlife, deserves our respect and care. Responsible travel minimizes our environmental impact and ensures that future generations can also experience this incredible region. This section Artikels crucial tips for a sustainable visit, encompassing everything from minimizing waste to supporting local communities.Responsible tourism is paramount in preserving Patagonia’s delicate ecosystem and supporting the livelihoods of its people.
By following these guidelines, you can contribute to the long-term health and beauty of this remarkable region.
Minimizing Your Environmental Impact
Understanding the fragility of Patagonia’s environment is essential for responsible travel. Adopting eco-friendly practices minimizes your footprint and protects the unique ecosystems. Travelers can reduce their environmental impact through conscious choices in accommodation, transportation, and activities.
- Choose eco-friendly accommodations:
- Embrace public transportation or carpooling:
- Pack reusable items:
Many lodges and hotels in Patagonia now prioritize sustainability. Look for establishments that utilize renewable energy sources, implement water conservation measures, and minimize their waste. Researching and selecting accommodations that have achieved certifications like LEED or Green Globe can help ensure environmentally responsible practices.
Reduce your carbon footprint by utilizing public transportation where available or carpooling with fellow travelers. This significantly lessens the environmental burden compared to individual car travel. If driving, consider fuel-efficient vehicles.
Bring reusable water bottles, shopping bags, and coffee cups to avoid single-use plastics. This simple act reduces waste and promotes a circular economy.
Responsible Wildlife Viewing Practices
Observing wildlife in their natural habitat is a privilege. Respecting their space and behavior is crucial for their well-being and for ensuring continued sightings in the future.
- Maintain a safe distance:
- Avoid feeding wildlife:
- Support organizations dedicated to wildlife conservation:
Observe wildlife from a respectful distance, avoiding sudden movements or loud noises that may disturb them. Maintaining a safe distance ensures the animals’ comfort and allows them to continue their natural behaviors.
Feeding wildlife can alter their natural behaviors and make them dependent on humans for food. This can disrupt their natural diets and put them at risk. Observe them from a safe distance and admire them in their natural environment.
Organizations dedicated to wildlife conservation in Patagonia often conduct research and engage in conservation efforts. Supporting these groups contributes directly to protecting Patagonia’s unique wildlife.
Proper Waste Disposal
Waste management is a critical aspect of responsible travel. Minimizing waste generation and properly disposing of what is produced is vital for maintaining the pristine environment of Patagonia.
- Pack out all trash:
- Utilize designated waste receptacles:
Pack out all trash generated during your trip. Leave no trace behind, ensuring that the natural beauty of the park remains untouched. This practice directly impacts the preservation of the natural environment.
Always dispose of waste in designated receptacles, avoiding littering in sensitive areas. Proper waste disposal helps maintain the area’s cleanliness and prevents environmental pollution.
Supporting Local Communities and Businesses, How to explore patagonia national park argentina
Supporting local communities and businesses directly benefits the people who live in and around the park. This also sustains the local economy, which often depends on tourism.
- Choose locally owned businesses:
- Purchase locally sourced products:
- Respect local customs and traditions:
Prioritize patronizing locally owned businesses and restaurants, which directly support the local economy. This economic support is crucial for local livelihoods.
Purchasing souvenirs and products sourced locally directly supports the local economy and encourages sustainable practices.
Respect the local culture and customs of the people who live in the region. Learning about and respecting local traditions enriches the travel experience.
Actionable Steps for a Sustainable Visit
Adopting these actionable steps can significantly reduce your environmental impact and contribute to the long-term preservation of Patagonia National Park.
- Plan your trip in advance:
- Pack reusable items:
- Choose eco-friendly transportation:
- Respect wildlife:
- Dispose of waste properly:
- Support local businesses:
Research responsible accommodations and tour operators to ensure your choices align with sustainable practices.
Bring reusable water bottles, coffee cups, and shopping bags to minimize single-use plastics.
Utilize public transportation or carpool to reduce your carbon footprint.
Maintain a safe distance from wildlife and avoid feeding them.
Pack out all trash and use designated waste receptacles.
Prioritize locally owned accommodations, restaurants, and shops.
Sample Itinerary for a Week-Long Trip
Embarking on a week-long adventure in Patagonia National Park demands careful planning. This itinerary balances iconic sights with opportunities for exploration, ensuring a memorable experience. It prioritizes sustainable practices, minimizing your impact on the pristine environment.This sample itinerary offers a flexible framework, allowing for adjustments based on your interests and physical capabilities. Remember to book accommodations and tours in advance, especially during peak season.
Weather conditions in Patagonia can change rapidly, so packing layers and being prepared for all eventualities is essential.
Suggested Activities and Accommodation
This itinerary focuses on the Torres del Paine region, renowned for its breathtaking landscapes and challenging yet rewarding hikes. It balances iconic viewpoints with opportunities for solitude and exploration. The itinerary suggests a mix of guided activities and independent exploration, accommodating varying levels of experience.
Logistics of Planning and Executing the Itinerary
Thorough planning is crucial for a successful trip. This involves securing necessary permits (if required), booking accommodations and transportation in advance, especially during peak season. Contingency plans for changing weather conditions are also essential. Inform your family or friends about your itinerary and expected return time, particularly if you plan to hike in remote areas. Ensure your communication devices have sufficient charge, especially in remote locations.
Sample Itinerary
| Day | Activities | Location | Estimated Time |
|---|---|---|---|
| Day 1 | Arrival in El Chalten, Check-in to Hotel, Exploration of the town | El Chalten | Full Day |
| Day 2 | Hike to Laguna Torre, optional boat trip to explore the lake | Torres del Paine National Park | Full Day |
| Day 3 | W Trek to Grey Glacier, overnight stay in a refugio | Torres del Paine National Park | Full Day |
| Day 4 | Return hike from the Grey Glacier to the base camp, exploring the surrounding area | Torres del Paine National Park | Full Day |
| Day 5 | Hike to the viewpoint of the Paine Grande, explore the surrounding trails | Torres del Paine National Park | Full Day |
| Day 6 | Explore the surrounding area of Torres del Paine, possibly visiting a local market or enjoying a picnic | Torres del Paine National Park | Full Day |
| Day 7 | Departure from El Calafate | El Calafate | Full Day |
Final Summary

Exploring Patagonia National Park is an experience that will stay with you long after you leave. This guide provides a roadmap for creating unforgettable memories, highlighting the beauty of the park, and ensuring a responsible and enjoyable visit. From the thrilling hikes to the amazing wildlife, Patagonia offers a journey of a lifetime. We hope this guide inspires your own adventure.


")